Creating SecureBoot Images
To understand how secure boot works in Microchip Ethernet SoCs you should start by reading the TF-A section for the platform you want to use:
In the current section we will show you how to setup a secure boot system from scratch using your own keys.
The steps we will cover are these:
-
Use the TF-A project to create your own keys and the images that uses these keys.
-
Adding the key material and images to the system
-
Booting the system using the new software and keys
-
Updating the system with new software
| The following description shows how to perform the steps for LAN969x and use the most advanced solution. You can customize this procedure to your own needs, but be aware that items that gets programmed into the OTP of the system cannot be undone or erased. |
1. Creating LAN969x images
In the following we will create authenticated and encrypted versions of these images:
-
BL2 (Trusted Boot Firmware)
-
BL31 (EL3 Runtime Software)
-
BL33 (Non-trusted Firmware, aka U-Boot in this description)
This will be done with a set of new keys.
The procedures for getting and building the TF-A project are described here:
We will be using the SSK to encrypt the images for delivery to the system, but on the system we will then re-encrypt (bind) the images to the specific system with a HUK.
The TF-A build script will include a default U-Boot version, but in the following we fetch and use the latest version available.
So this is what we do:
Clone the project:
git clone https://github.com/microchip-ung/arm-trusted-firmware
Remove the demo keys:
rm keys/*
Build a new set of keys for LAN969x:
dr ./scripts/build.rb -p lan969x_a0 --create_keys --release
Get the latest version of U-Boot for LAN969x:
wget http://mscc-ent-open-source.s3-eu-west-1.amazonaws.com/public_root/bsp/mchp-brsdk-arm64-2025.03.tar.gz
tar xf mchp-brsdk-arm64-2025.03.tar.gz --wildcards */u-boot-mchp_lan969x.bin --strip-components=4
Build the images (and the latest U-Boot) and encrypt these with the new SSK:
dr ./scripts/build.rb -p lan969x_a0 --release \
    --bl33_blob u-boot-mchp_lan969x.bin \
    --encrypt-images BL2,BL31,BL33 --encrypt-ssk ./keys/ssk.bin
During the build you will see warnings that relates to the GPT such as
this: Caution: Found protective or hybrid MBR and corrupt GPT. This is not
an error in the build, but is caused by a truncation of the disk image, which
removes the backup table to save space. The backup table will automatically be
recreated when the filesystem is used. These warnings can therefore be ignored.
|
Now we have these results:
-
A new set of keys in
./keys -
A new set of images in
./build/lan969x_a0/release
| Make sure that you keep your keys in a secure storage from now on. See Guideline for for secure provisioning for more information. |
In the following we will need to use these keys:
-
ROT Public Key SHA256 value:
keys/rotpk_ecdsa_sha256.bin -
SSK value:
keys/ssk.bin
1.1. Creating a key file
To make it easy to transfer and program the keys in your system, you can create a binary file that contains these two keys and has room for two more. The content of the file must be like this:
| Offset | Size in bytes | OTP Field | Description | Value |
|---|---|---|---|---|
0x00 |
32 |
ROTPK SHA256 |
The SHA256 of the ROT Public Key |
keys/rotpk_ecdsa_sha256.bin |
0x20 |
32 |
HUK |
The Hardware Unique Key |
Leave at 0 |
0x40 |
32 |
EK |
The endorsement key |
Leave at 0 |
0x60 |
32 |
SSK |
The Secret Symmetric Key |
keys/ssk.bin |
| The EK (endorsement key) is not used in this version of TF-A. |
Here is how you can create the file:
cp keys/rotpk_ecdsa_sha256.bin lan969x_keys.bin
truncate -s 96 lan969x_keys.bin
cat keys/ssk.bin >> lan969x_keys.bin
The lan969x_keys.bin file can then be transferred to the system (e.g. via a network connection or a USB stick) and used to program the keys in one operation.
2. Adding keys and images to the system
You should have a LAN969x system that boots without secure boot as a prerequisite.
Start by booting this system into the Linux Console.
2.1. Using the OTP tool
In the following we will program and protect the keys on the system. This done
using the otp tool in the root file system.
| Make sure you understand how the tool works before making any changes to your system, as the changes cannot be reversed. |
Here is where the tool is described: LAN969X OTP Configuration from Linux userspace
The system keys are stored in region 4 of the OTP and consists of these 5 keys:
| Offset | Size in bytes | OTP Field | Description |
|---|---|---|---|
0x0100 |
32 |
OTP_TBBR_ROTPK |
The SHA256 of the ROT Public Key |
0x0120 |
32 |
OTP_TBBR_HUK |
The Hardware Unique Key |
0x0140 |
32 |
OTP_TBBR_EK |
The endorsement key |
0x0160 |
32 |
OTP_TBBR_SSK |
The Secret Symmetric Key |
0x0180 |
32 |
OTP_SJTAG_SSK |
The SSK for the JTAG interface |
Now use the OTP tool to display the OTP fields:
otp -d /sys/bus/nvmem/devices/lan9662-otp0/nvmem field list
As long as the system has not been locked down (the keys have been protected) then you can read the fields containing the keys.
Here is how to read the ROT SHA256 field, the HUK field, the EK field and the SSK field:
otp -d /sys/bus/nvmem/devices/lan9662-otp0/nvmem field get OTP_TBBR_ROTPK
otp -d /sys/bus/nvmem/devices/lan9662-otp0/nvmem field get OTP_TBBR_HUK
otp -d /sys/bus/nvmem/devices/lan9662-otp0/nvmem field get OTP_TBBR_EK
otp -d /sys/bus/nvmem/devices/lan9662-otp0/nvmem field get OTP_TBBR_SSK
This group of 4 keys are the ones that the otp tools import-keys command can
program in one operation,
For now all these fields should contain all zeroes.
Now transfer the lan969x_keys.bin file to your system.
| Put the lan969x_keys.bin file /tmp folder on your LAN969x’s file system as this folder is always writable. |
You can now program your system with these keys and create a HUK on the fly with the following command:
otp -d /sys/bus/nvmem/devices/lan9662-otp0/nvmem import-keys /tmp/lan969x_keys.bin
The HUK will be generated on the fly by the OTP program which will ensure
that it never leaves the system. If you do not want to use a HUK you must add
the --no-randomize-huk option to the otp tool command.
|
The result of the command can be inspected by reading the 4 keys with the otp tool again:
otp -d /sys/bus/nvmem/devices/lan9662-otp0/nvmem field get OTP_TBBR_ROTPK
otp -d /sys/bus/nvmem/devices/lan9662-otp0/nvmem field get OTP_TBBR_HUK
otp -d /sys/bus/nvmem/devices/lan9662-otp0/nvmem field get OTP_TBBR_EK
otp -d /sys/bus/nvmem/devices/lan9662-otp0/nvmem field get OTP_TBBR_SSK
-
The OTP_TBBR_ROTPK should have the same value as in the original
keys/rotpk_ecdsa_sha256.binfile. -
The OTP_TBBR_HUK field should contain a random value.
-
The OTP_TBBR_EK field should still contain all zeroes.
-
The OTP_TBBR_SSK field should contain same value as in the original
keys/ssk.binfile.
You can compare the binary contents of the files using the hexdump tool with
the -C option.
2.2. Secure JTAG key
The OTP_SJTAG_SSK field is also part of the OTP key region, so before you protect the region you will need to decide if this field should have a non-zero value.
If you want to project access to your system via JTAG you should put a random number value in this location. This can be done like this.
Generate a random 32 byte value:
head -c 32 /dev/urandom | xxd -p -c 32
Write this value to the OTP_SJTAG_SSK field in the OTP:
otp -d /sys/bus/nvmem/devices/lan9662-otp0/nvmem field set OTP_SJTAG_SSK \
    hex <the output from the xxd command above>
Remember to save the key value in a safe place in case you later need to use the Secure JTAG.
2.3. Protect access to keys in your system
| Only take the next step if you are done with programming the keys. In particular you need to consider if you need to protect the JTAG interface with an SSK like shown in the previous section. |
Now you should prevent your keys from being changed any further.
otp -d /sys/bus/nvmem/devices/lan9662-otp0/nvmem region write-protect 4
This protects region 4 (the key region) from being written to, and also from being accessed from the Non-secure world (e.g Linux).
This protection will take effect after the next reboot.
After rebooting the system it is no longer possible to read out the keys with the OTP tool.
If you try to use the OTP tool to get the SSK you now will just see all-zeroes:
# otp -d /sys/bus/nvmem/devices/lan9662-otp0/nvmem field get OTP_TBBR_SSK
32 0000000000000000000000000000000000000000000000000000000000000000|................................|
3. Booting the system using the new software and keys
You have been updating the ROT, the SSK and the HUK on your system in the previous section, so the current images stored in NOR flash (or eMMC) will no longer be able to boot as they do not contain the expected certificates.
So you must now update the NOR flash storage with the nor.gpt image containing
the signed and encrypted images found here: build/lan969x_a0/release/nor.gpt
(or build/lan969x_a0/release/mmc.gpt for the eMMC storage).
This GPT image has the FIP that contains the BL2, BL31 and BL33 signed with the correct keys, but these 3 images need to be re-encrypted with the BSSK (which is a key derived from the HUK stored in the device) before being stored in flash.
Use the FWU section to start a
browser and load the HTML file found here: build/lan969x_a0/release/fwu.html.
This has the BL2U image embedded which can then be downloaded to the system.
| You must use the fwu.html file from the build you did earlier, as the embedded BL2U image is also encrypted with SSK that has been programmed into the OTP of your system. |
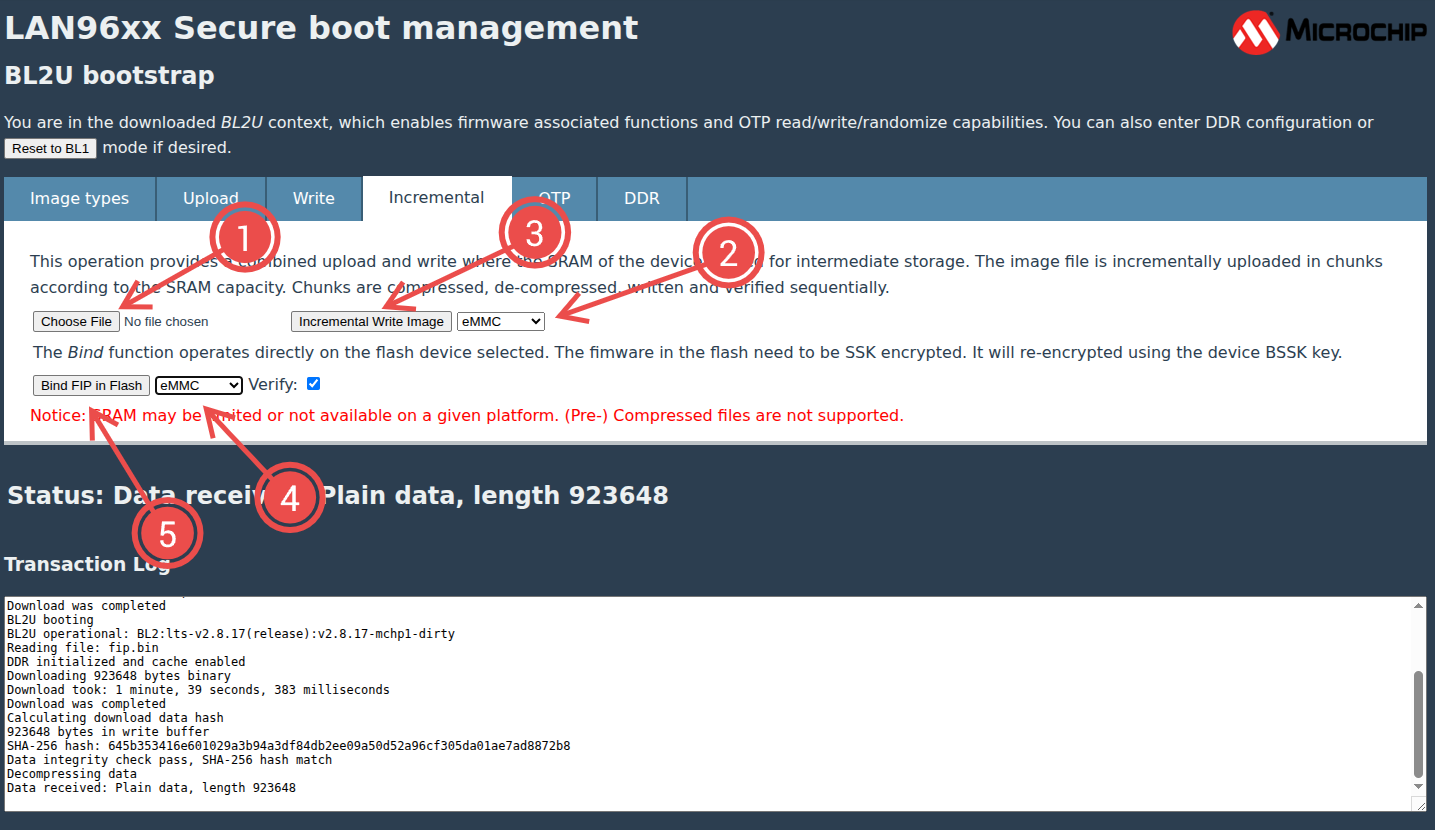
When the correct BL2U image has been loaded and is running in your system select
the "Incremental" tab in the FWU interface and use the "Choose File" button to
upload the nor.gpt file from your build folder.
Select which destination you want for the image by selecting
either NOR flash or eMMC in for the incremental write operation.
Press the "Incremental Write Image" button to start the transfer. This will take some time so please be patient. The download may start several times and write each chunk to the flash before continuing.
Finally you need to use the "Bind FIP in Flash" button: This will decrypt the boot stage images contained in the flash using the SSK and re-encrypt them using a key derived from the HUK in your system (the BSSK) and write them back in place.
You should now be able to boot your system using the GTP image in your NOR or eMMC Flash.
| If you are not using BSSK encryption (the HUK), then you just need to skip the "Bind FIP in Flash" step. |
4. Updating the system with new software
In case you need to update the software on your secure booting system, you need to make sure that you build the images using the same set of keys as you did when you did your first secure boot.
So fetch the set of keys from your secure offline storage and put them in your
projects keys folder and prepare to build new images.
If you need to prevent rollback to earlier versions of the software you can increment the secure and/or non-secure counters in your certificates. This is described in more details in the Rollback protection section.
This will update your systems counters, so it will no longer be possible to boot images that contain counters with lower values.
To build your system with a Trusted FW NV counter of 4 and a Non-Trusted FW NV counter of 3 you need to build the software like this:
dr ./scripts/build.rb -p lan969x_a0 --release --fw-nvctr 4 --ntfw-nvctr 3 \
    --bl33_blob u-boot-mchp_lan969x.bin \
    --encrypt-images BL2,BL31,BL33 --encrypt-ssk ./keys/ssk.bin
You then follow the description in the previous section to connect, upload and bind the new GPT image to your system.